Monday, September 5, 2016

Banoffee Tartlets


A quick and easy dessert using puff pastry filled with chocolate, bananas and dulce de leche. All of the flavors of a banoffee pie without all of the work!

Ingredients:

1 (17.30-ounce) package frozen puff pastry, thawed
8 ounces milk chocolate, broken into ½-ounce squares
1 large or 2 medium bananas, sliced in 32 rounds
8 teaspoons dulce de leche
2 tablespoons unsalted butter, melted
Granulated sugar, for sprinkling

Directions:

1. Preheat oven to 400 degrees F. Line a large baking sheet with parchment paper.

2. Place one sheet of puff pastry on a lightly floured work surface, sprinkle with a little additional flour, and gently roll out into a 14-inch square.

3. Place the squares of chocolate evenly spaced over the pastry. Top each square of chocolate with two slices of banana. Spoon a ½ teaspoon of dulce de leche over each set of bananas.

4. Roll out the second sheet of puff pastry as you did the first, and lay it gently on top of the prepared pastry. Using a pizza cutter or ravioli cutter, slice between the chocolate/banana/dulce de leche pockets. Gently separate them and, using a fork, press along the edges to seal together.

5. Place the tartlets on the parchment-lined baking sheet, brush each with melted butter and sprinkle with sugar. Bake for 15 to 20 minutes, or until golden brown. Remove from the oven and allow to cool for at least 10 minutes before serving. Serve warm or at room temperature.

Make-Ahead Note: These can be assembled (through step #4), placed on a baking sheet and frozen. Once completely frozen, transfer to a freezer-safe ziploc bag and store for up to 2 months. Bake according to the direction in step #5, adding a couple more minutes to the baking time.

Thursday, August 11, 2016

Giant Bourbon biscuit


How amazing is this giant Bourbon biscuit? If you love classic chocolate Bourbon biscuits then you really have to make this showstopping version. This giant biscuit is sure to turn a few heads when it comes to serving. It's so simple to make too, taking only 10 mins to prepare and 20 mins to cook. Made with a classic chocolate biscuit recipe and filled with a rich, Bourbon infused chocolate spread, this biscuit is definitely one of a kind.

Ingredients

  • 250g butter
  • 125g caster sugar
  • 375g plain flour
  • 6tbsp cocoa powder
  • 1 1/2 tsp bicarbonate soda
  •  
    Method

    1.Preheat the oven 180C, gas 4. Grease and line two 16cm x 26cm baking trays with greaseproof paper.

    2. Cream the butter and sugar together in a large mixing bowl. Add the rest of the ingredients and bring together with clean hands to form a dough.

    3. Cut the dough in half and roll out each to make a large rectangular shape to fit the tins. Put each biscuit into the trays and using letter cutters decorate each as a Bourbon biscuit. Bake in the oven for 20 mins.

    4. Leave to cool before removing from the baking trays – use the greaseproof paper to help slide the biscuits off of the trays onto a wire rack.

    5. To assemble the giant biscuit, carefully spread one biscuit with the spread and place the second biscuit on top.

    Monday, August 8, 2016

    Omelette recipe with a goat’s cheese twist


    Tired of the usual omelette recipe? Not any more. Your go-to 'I-don't-know-what-to-eat-for-dinner' dish is livened up with some goat's cheese.

    Ready in 10 minutes 

    Cooking time 5 minutes
     
    Prep time 5 minutes 
     
    Serves 1 person
     

    Ingredients
     
    3 eggs
     
    Handful fresh chives, finely chopped 
     
    ½ tbsp olive oil
     
    30g goat's cheese
     
     
    Method
     
    1. Whisk the eggs until well combined. Add the chives and season with black pepper. 
     
    2. Place the oil in a small omelette pan over a medium heat. When the pan is hot, pour in the eggs. Swirl the pan gently over the heat to ensure the base of the pan is coated evenly. Use a spatula to slowly push the uncooked mixture to the edges. 
     
    3. When the omelette starts to set on the bottom, sprinkle over the goat’s cheese. Leave until almost entirely set, then fold over in the pan and slide on to a plate. Serve with a cherry tomato salad.


    The Absolute Best Bolognese Sauce Recipe


    If you are looking for something special to makefor Valentine’s Day this weekend, I highly recommend this Bolognese Sauce recipe.

    In true Marcella Hazan fashion, this classic Italian recipe tastes like so much more than your average at-home pasta dish. Every single time I make this for guests and friends, they marvel over every bite – really, you made this? It’s that good..

    Serves 6

    Ingredients:

    1/2 cup chopped yellow onion
    2 tablespoons olive oil
    3 tablespoons butter, divided
    1 stalk celery, chopped
    2 large carrot, chopped
    3/4 pound ground lean beef
    salt and freshly ground pepper
    1 cup dry white wine
    1/2 cup whole milk
    pinch of ground nutmeg
    2 cups canned Italian whole plum tomatoes, chopped, with their juice
    1 lb pasta (traditionally tagliatelle, but fettuccine and spaghetti work too)

    Step 1:

    In a Dutch oven, or large heavy bottomed pot, heat the butter and olive oil over medium heat. Add the onion and sauté until translucent. Add the celery and carrot and sauté for an additional 2 minutes.

    Step 2:

    Add the ground beef, using a fork or spatula to crumble it as you stir. Add 1/2 teaspoon salt and cook meat just until it is no longer pink.

    Step 3:

    Add the wine and increase heat to medium-high. Let the wine simmer until it has evaporated completely.

    Step 4:

    Add the milk and a pinch of nutmeg. Reduce heat to medium and let the milk simmer until it has evaporated completely.

    Step 5:

    Add the tomatoes and stir until thoroughly mixed. When the tomatoes begin to bubble, reduce heat to the lowest simmer and cook uncovered for at least 3 hours, but optimally 5 hours. Stir occasionally during the cooking process. If you keep it on the lowest possible simmer, you shouldn't need to add any more liquid. If, however, it starts to stick, add a few tablespoons of water, but make sure no water is left at the end of the cooking time. Taste and adjust salt if necessary.

    Step 6:

    Serve over cooked pasta, tossed with a teaspoon or two of butter. Top generously with freshly grated Parmesan.

    Monday, July 18, 2016

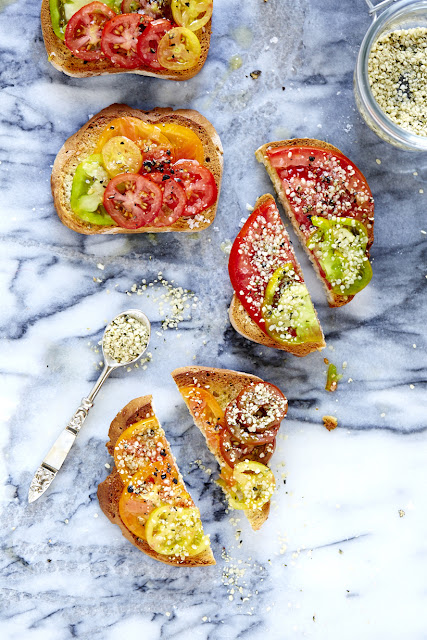
    Heirloom Tomato Toast


    Finally: tomato season is in full swing!  The farmer’s market is bursting with the most beautiful array of heirloom tomatoes and I want to use them on everything. Besides simple summer salads & no-cook sauces, toast is my favorite way to eat tomatoes this time of year. 

    They don’t need much – just some garlic, olive oil & a sprinkle of flaky sea salt. For tomorrow’s breakfast (and even lunch and dinner when it’s too hot to turn on the oven) this toast is your new go-to.

    Ingredients

    • 4 thick slices bread, toasted
    • 1 garlic clove, peeled
    • 3-4 medium sized heirloom tomatoes, sliced thin
    • 2 tablespoons hempseeds
    • Flaky sea salt, to taste
    • Freshly cracked pepper
    • 2 tablespoons extra virgin olive oil
    Instructions
     
    Once bread is toasted & still warm, rub garlic clove over each slice. 
    Layer heirloom tomatoes over each toast.
    Top each slice with hempseeds, flaky sea salt and freshly cracked pepper. 
    Drizzle over extra virgin olive oil before serving.


      Thursday, July 14, 2016

      Mango Chile Lime Popsicles (Recipes)

       
      The Skinny:


      Servings: 6 • Size: 1 Popsicle • Calories: 70.6 • Fat: 0.4 g • Carb: 18.3 g • Fiber: 2.2 g • Protein: 0.6 g • Sugar: 15.6 g • Sodium: 4.5 mg
       
      Ingredients:

      3 Large Ripe Mangos, Peeled, Pitted & Cubed


      3/4 Tsp. Chili Powder, Divided

      1/8 Tsp. Cayenne, Divided


      2 Tbsp. Water

      2 Tbsp. Fresh Lime Juice
       
      Directions:


      Combine 1/3 of the cubed mango in a small bowl with 1/2 tsp. of the chile powder and about half of the cayenne.
       
       
      Puree the other 2/3 of the mango, the remains of the chili powder and cayenne, water, and lime juice together in a food processor or blender until perfectly smooth.


      Place about 2 tbsp. of the cubed mango mixture into the bottom of the popsicle mold and then top with the puree.

      You may want to tap the mold carefully a few times on the countertop to help get rid of any air bubbles.
       
      Place the popsicle sticks into the fruit.

      Mine stood on their own and didn't need anything to help hold them up.
      Freeze for 2-4 hours or until frozen solid.


      Sunday, July 10, 2016

      Whole Roast Chicken


      3 to 4 1/2-pound whole chicken
      Kosher salt
      Herbs and/or spices of your choice (used smoked hot paprika)
      Extra virgin olive oil
      1/2 to 2 whole lemons, thinly sliced
      12 to 14 small whole potatoes
      Small bunch fresh rosemary
      1 head of garlic, separated into individual cloves, skins on (more if you like)
      Sea salt and fresh ground black pepper

      Remove the giblets from the cavity (if there are any) and set aside for later use. Pat the chicken dry inside and out with paper towels. Presalt the chicken (based on the amounts above) by sprinkling the salt all over the chicken's surface, including the back, thighs, and drumsticks, and a little in the cavity. Add other seasonings/herbs of your choice at this point as well. Arrange the salted chicken on a wire rack and set in a baking dish to catch any drippings. Refrigerate, ideally uncovered, or loosely with plastic wrap, for as little as 8 hours and up to 48 hours. 

      Let the chicken sit at room temperature for an hour before roasting. If you like, you can squeeze the juice of a lemon or two and stuff the cavity with the rinds [reserve the juice for other uses]. You can also truss the bird if you desire (but it's not necessary), by tying the two drumsticks together with kitchen string.

      In a large bowl, toss the potatoes with 1 to 1 1/2 tablespoons olive oil, salt and pepper, and 1 tablespoon chopped rosemary. 

      Position a rack in the center of the oven. Preheat the oven to 400 degrees. Arrange the lemon slices in a single layer in a large ovenproof skillet or gratin pan. Place the chicken on top of the lemon slices and tuck the wing tips back, so they are secure under the neck bone. Rub 2 teaspoons of olive olive over the breasts and legs. Scatter the potatoes and garlic cloves around the pan. Place a few whole sprigs of rosemary in the pan as well. Roast the chicken with the legs facing toward the back of the oven. Roast until the juices run clear with only a trace of pink (when you prick the thigh) and an instant thermometer inserted in the thickest part of the thigh (without hitting the bone) registers 170 degrees. Let rest 20 minutes before serving.

      Note: Stevens suggests 1 to 1 1/4 hours for a 3 1/2 to 4-pound chicken. Took 45 minutes for my chicken, which was just under 3 pounds.

      Monday, July 4, 2016

      3 Crazy Diets You Won’t Believe Work


      Thinking of going back on a diet, but tired of the same diet plans? Try these five weird diets. They’re all proven to help you burn fat – to some extent. The curiosity and novelty will make you more likely to stay on them and lose weight.

      1. The Werewolf Diet

      Originating in Latin America, the Werewolf Diet has you eating in sync with the lunar cycle. It boasts making you lose 6 pounds in one day, and even celebrities like Demi Moore and Madonna have tried it! The logic is that your body has about 60 percent water, and the moon’s influence on gravity affects you like it affects the tides.

      There are two versions of the diet: basic and extended. The basic diet has you on a fluid detox, drinking only healthy natural liquids (like water, juice, and birch water), on the day of a full moon. The full moon’s strong gravitational pull supposedly boosts the detox’s toxin-eliminating effects.
      The extended diet first follows the basic diet then instructs you to lower your solids or increase your liquids depending on the moon phase.

      Supposedly during a waning moon, your cravings significantly decrease and it’s easier to lose pounds. But, during a waxing moon your cravings increase and you need to restrict your eating.

      Is this supported by science? Even if the full moon’s gravity doesn’t help you get rid of toxins, the juice and water fasting definitely will. Birch water and fruit juices are filled with antioxidants, which help your body neutralize toxins, and their high-water content flushes toxins out of your system.
      Will eliminating toxins help you lose weight? Yes! Scientists found that environmental pollution affects your body’s ability to burn fat and regulate sugar levels. Getting rid of these toxins helps bring your body’s metabolism back to normal.

      Also, estrogen encourages insulin production. When your hormones become imbalanced and your body makes too much estrogen, it forces your body to store more sugar in your fat cells instead of burning it. This leads to weight gain. Studies show that the moon’s phases influence your menstrual cycle and your estrogen levels, which slightly supports the extended diet’s belief that your metabolism increases or decreases during certain moon phases.

      This diet may seem whacky, but it will help you burn that fat. If anything, doing things under the full moon seems healthy for your body overall. Some studies found that patients who undergo heart surgeries during a full moon have better survival rates and need less recovery time.

      2. The Sandwich Diet

      This cool diet comes from Spain. It’s very simple: You eat whatever you want, but it all has to fit between two pieces of whole-grain bread. You can have your BLT and cheeseburgers – as long as they fit between those two pieces of bread!

      Does it work? Yes and no. Many studies found that using a bigger plate or bowl makes you serve and eat larger portions. Using a smaller plate makes you more aware of the portions you’re eating, reducing your risk of overeating. The sandwich works like a smaller plate. This diet helps you lose weight using portion awareness.

      Why isn’t it so good? Fast food burgers fit between two pieces of bread – do you think eating those three times a day will make you skinnier?

      3. The “Sun Eating” Diet

      China’s hip crowd is convinced people can do photosynthesis – you know, like plants? You replace one meal with a 44-minute sunbath every day. They believe you’ll absorb “solar energy,” which supposedly suppresses your appetite and improves your sleep. Dieters report losing weight.
      Will it really help you lose weight? Yes! New research found that when sunlight hits your skin, it makes nitric oxide. Mice that overate and were exposed to UV rays had slower weight gain and less abnormal blood sugar levels than mice that weren’t exposed. From these findings scientists believe nitric oxide boosts your fat and sugar metabolism, while also helping prevent type 2 diabetes and obesity.
      If you’re not getting enough sun, this diet will boost your metabolism. You’ll also lose weight since you’re skipping a meal every day. If you try it, don’t skip breakfast. Eating breakfast boosts your resting metabolism by 10 percent.

      Friday, July 1, 2016

      COCONUT MELTAWAY COOKIES


      This sweet cookie has a buttery soft shortbread base (that is lightly coconut flavored) and it is topped with royal icing made with coconut milk and toasted coconut. They truly melt when you bite into them and the crunchy toasted coconut on top is perfect contrast to the soft cookie.
      INGREDIENTS
      Cookies
      • 2 cups all-purpose flour*
      • 1/2 teaspoon baking powder
      • 1/4 teaspoon salt
      • 1 cup (2 sticks) unsalted butter, room temperature
      • 3/4 cup Dixie Crystals Extra Fine Granulated Sugar
      • 1 large egg
      • 1/4 teaspoon coconut extract
      Icing
      • 1 cup Dixie Crystals Confectioners Powdered Sugar
      • 1 tablespoon coconut milk (or water)
      • 1 cup toasted shredded coconut
      *Spoon & Sweep method: Use a spoon to fill measuring cup with flour until required amount is obtained. Scooping measuring cup directly into flour bag will firmly pack flour resulting in too much flour required for recipe.
      DIRECTIONS
      1. Preheat oven to 375°F. Line a baking sheet with parchment paper or a silpat. Set aside.
      2. In a medium bowl, whisk together flour, baking powder and salt. Set aside.
      3. In a stand mixer, beat butter and sugar until light and fluffy. Add egg and coconut extract, mixing until combined. Add flour mixture 1/2 cup at a time, mixing until completely combined.
      4. Roll 1 tablespoon of dough into small circles and then flatten with hands (or with the bottom of a cup) into a disk shape. Place on prepared baking sheet.
      5. Bake for 8 minutes. The cookies will not look browned or cooked, but they are.
      6. Remove from oven and let cookies rest on baking sheet for 5 minutes. Then transfer to a wire rack to cool completely.
      7. For the icing: In a small bowl, whisk together powdered sugar and coconut milk until smooth.
      8. Using a spoon, smooth icing onto the top of each cookie. Quickly sprinkle with toasted coconut and let set for 10 minutes, or until hardened.
      9. Serve immediately or store in an airtight container for up to 5 days.

      Tuesday, June 28, 2016

      Strawberry Plum Rose Sangria


      Ingredients


      • 3 plums sliced
      • 1 cup sliced strawberries
      • 1 cup of seeded and sliced cherries
      • ¼ cup Chambord Liqueur
      • 1 bottle Rosé Wine
      • 1 can of lemon lime soda
      Instructions
      1. In a pitcher, add plums, strawberries and cherries.
      2. Add Chambord and wine then stir.
      3. Refrigerate up to 2 hours
      4. Add lemon lime soda and stir before serving.
      Notes
       
      Add 1-2 tablespoons of simple syrup if you like a sweeter drink.

      Zucchini Pizza Crust Recipe

      Ingredients
      • 3 cups shredded zucchini
      • 1 tsp salt
      • 2 eggs
      • ½ tsp baking powder
      • ⅓ cup whole wheat flour
      • ⅓ cup shredded part-skim mozzarella cheese + 1 cup to top the pizza
      • 1 large tomato, sliced into ¼ inch rounds
      • fresh basil for serving
      Instructions
       
      For the crust:
      1. Preheat oven to 450F. If using a pizza stone, place it inside at the lower part of the oven, while still cold.
      2. Combine shredded zucchini and salt in a colander. Place over a bowl and let it drain for 15 minutes. After that, squeeze out as much liquid out of the zucchini as you can and transfer to a bowl.
      3. Add eggs, baking powder, flour and mozzarella. Mix to combine.
      4. Place over parchment paper and spread mixture, forming a circle. It should be 10-12 inches in diameter and ½ inch thick. Place on a pizza pan or over pizza stone.
      5. Bake for 8 minutes and take pizza crust out of the oven.
      6. Add tomato slices and top with cheese. Bake for additional 15 minutes at 375 F. Keep an eye on the pizza, take out of the oven, when cheese is melted and bubbly.
      7. Slice and serve.

      Saturday, June 25, 2016

      Creamy Spinach Tomato Pasta – Ready In 25 Minutes!


      Ingredients

      • 8 oz dry pasta - such as farfalle
      • 1-2 tbsp olive oil or buttery spread or oil spray
      • 1 1/2 tbsp minced garlic
      • 3 tbsp flour (spelt, white, or sweet rice flour)
      • 1 tsp onion powder
      • 1/2 tsp salt
      • 1 1/2 tsp dried oregano
      • 1 cup cashew cream or unsweetened creamer – I like Nutpods Dairy Free Creamer
      • 1/4 cup Parmesan-type topping or nutritional yeast, optional
      • 1 cup unsweetened milk of choice or additional creamer
      • 1 can diced tomatoes, or 14 oz diced tomatoes
      • 1 cup fresh or 1/2 cup frozen spinach, optional

      Instructions

      Bring a salted pot of water to a boil. Boil pasta according to package directions, then drain fully but do not rinse. Meanwhile, sauté the garlic in the oil for 1 minute. (Technically, you can use oil spray, but the oil will give a richer flavor and will help the sauce adhere to the pasta – It amounts to less than a teaspoon per serving, and I really think the flavor will be much better if you use oil instead of spray.) Add the flour, onion powder, and salt. Sauté an additional minute, then whisk in the creamer, milk, oregano, and Parmesan, if using. Bring to a boil, whisking constantly. Boil and whisk for about a minute, then add the tomato and spinach – You can omit the spinach if desired. Stir until sauce thickens. Add the pasta and stir to coat. Season with salt and pepper if desired. If the pasta absorbs the sauce and looks dry, stir in a little more milk of choice until sauce is creamy again.

      Monday, June 20, 2016

      Amazing Benefits Of Pineapple

      Pineapples are a delicious tropical fruit. They can be consumed fresh, cooked, juiced, or preserved.

      Apart from being a popular ingredient for a wide array of cuisines, the pineapple lpiña in the Philippines, commonly used as the material for the men’s Barong Tagalog and women’s Baro’t saya formal wear in the country.
      eaves are used to produce the textile fiber

      The fiber is also used as a component for wallpaper and other furnishings.

      Aside from all this cool stuff the pineapple can do and produce, it also provides lots of amazing benefits for your health!

      1. Pineapples Strengthen Your Nails And Prevent Hair Loss

      To soften and strengthen your nails, you can make lotion at home using 1 tablespoon fresh pineapple juice, 1 egg yolk, 1 teaspoon lemon juice, and 2 drops of lemon oil. Mix these together and then put it on your nails and cuticles (q-tips would work well, or a cotton ball, or thin makeup brush!). This is a safe lotion and can be used daily.

      Just as Vitamin C is good for skin, Vitamin C is an important element that aids in preventing hair loss. It is a powerful antioxidant that combats free radical damage. Pineapple is a rich source of this water soluble vitamin. Eat pineapples in wedges or just juice them fresh to reap the benefits of Vitamin C and prevent hair loss and help thicken hair.

      Daily consumption of pineapple can help prevent and ease inflammatory conditions, which affect the scalp, using Bromelain, the anti-inflammatory enzyme. It can also offer relief from infections of the scalp, preventing unwanted hair fall.

      2. Pineapples Keep Your Skin Flawless and Firm

      The Vitamin C in pineapples can be used internally as well as externally, as a cure for acne and other inflammatory skin conditions. Bromelain, the anti-inflammatory enzyme in this fruit, boosts up the healing power of Vitamin C!

      Also, pineapple gives the collagen synthesis in your body a boost. The higher the collagen synthesis is, the firmer and more flexible your skin will be. The added nourishment comes from the presence of amino acids and Vitamin C, which ensures that the damaged cells and tissues are repaired quickly.
      How to use: Apply freshly prepared pineapple juice on the face.

      Wash off using tepid water after 10 minutes. Feel the tingle! Or try freshly crushed pineapple wedges to exfoliate your skin and make it look healthier! This will eliminate the dead skin and accentuate blood flow.

      For more exfoliation, try using pineapple on your feet to help with callouses and cracked heels. The exfoliating property of pineapple, along with its collagen synthesizing nature, helps soften skin and get rid of dead skin. It will also assist with the inflammation associated with cracks on your feet.

      In a 100 gram serving, raw pineapple is an excellent source of Manganese (44% of Daily Value) and Vitamin C (58% of Daily Value), and also includes potassium, copper, calcium, magnesium, beta carotene,  thiamine, B6, and folate, as well as soluble and insoluble fiber.

      The health and medicinal benefits of pineapples include their ability to improve respiratory health, cure coughs and colds, improve digestion, help you lose weight, strengthen bones, improve oral health, boost eye health, reduce inflammation, prevent cancer, increase heart health, fight off infections and parasites, improve the immune system, and increase circulation.

      I could spend hours telling you about ALL the benefits of pineapple, but here are a few big ones that are both interesting and informative!

      3. Pineapples Reduce Symptoms of Arthritis

      One of the most celebrated benefits of pineapple on health is its ability to reduce the inflammation of joints and muscles, particularly those associated with arthritis, a truly debilitating disease that impacts millions of people around the world. Pineapples contain Bromelain, which is primarily associated with breaking down complex proteins, but it also has serious anti-inflammatory effects, and has been positively correlated with reducing the signs and symptoms of arthritis in many test subjects.

      4. Pineapples Help Cure Coughs, Colds and Sinusitis

      The normal immune system boosting power of vitamin C is well known, but the enzyme, Bromelain, is also connected with the reduction of phlegm and mucus build up in the respiratory tracts and sinus cavities. It therefore prevents the illnesses that cause phlegm and mucus build-up, while also treating them by loosening those materials and helping you eliminate them from your body if you’ve already contracted an illness or infection. Eating pineapple along with prescribed medicines can help cure colds and coughs!

      5. Pineapples Tackle Digestive Problems

      Like most fruits, pineapples are a rich source of fiber, but they are special in that they contain both soluble and insoluble fiber. This means that eating a healthy amount of pineapples can protect you from a vast amount of digestive health conditions, including constipation, diarrhea, irritable bowel syndrome, atherosclerosis, blood clotting, and irregular blood pressure.

      Let’s Eat It!

      Sunday, June 19, 2016

      Cacao Cashew Butter


      • Ingredients


      • 250g cashews
      • ¼ - ½ cup water, room temperature
      • 1 tsp. sea salt
      • 1 tsp. cacao
      • ½ tsp,cinnamon 
      • 1 tsp. maple syrup, more if needed
      • Coconut oil or olive oil, drizzle
      • Select all ingredients
      • Method

      • Place all ingredients apart from the oil in a food processor and blend until smooth.
      • Add extra water until desired consistency is reached.
      • Spoon into a jar and drizzle with coconut or olive oil, keep in the cupboard for a few days

      Thursday, June 16, 2016

      Lemon Cheesecake Crescent Rolls

      Super easy and incredibly soft Crescent Rolls filled with a sweet and delicious lemon and cream cheese mixture.

      for more watch video:


      Sunday, June 12, 2016

      Mozzarella Chicken in Tomato Sauce

      A quick and easy Mozzarella Chicken In Tomato Sauce made in the one skillet in under 15 minutes?

       When craving a Chicken Parmigiana and no time to make it, I opt for this quick version, smothered in tomato sauce and topped with melted mozzarella cheese. If you don’t have the time to make a restaurant quality dinner, but you’re craving those flavours, this recipe is for you!

      INGREDIENTS
      • 1 teaspoon dried basil leaves
      • 1 teaspoon dried parsley leaves
      • ½ teaspoon ground oregano
      • Salt and freshly ground black pepper
      • 1 tablespoon olive oil
      • 2 skinless and boneless chicken breasts, halved to make 4 fillets
      • 1 teaspoon minced garlic
      • 1 cup your favourite Marinara tomato sauce
      • 1-2 teaspoons Italian seasoning (adjust to your tastes)
      • ½ cup shredded mozzarella

      INSTRUCTIONS
      1. Preheat the broiler/grill to a medium heat setting.
      2. Combine the herbs in a shallow bowl with salt and pepper and oil. Coat both sides of each chicken fillet with the oil. Heat a large heavy oven-proof skillet over high heat. Add the fillets and pan fry on each side until golden (about 3 minutes on each side).
      3. Add the garlic to the same pan and allow to fry until fragrant (about 30 seconds). Spoon the marinara sauce over and around the chicken. Add the Italian seasonings into the sauce and stir them through. Sprinkle 2 tablespoons of the mozzarella over each chicken fillet; transfer to the oven and broil / grill until the cheese has melted and the chicken is cooked through (about 3 to 5 minutes).
      4. Garnish with freshly chopped parmesan cheese and serve over zucchini noodles, rice, pasta, steamed vegetables, or with a salad!

      Thursday, June 9, 2016

      Greek Yogurt Blueberry Waffles with Fresh Blueberry Sauce

      Homemade Greek Yogurt Blueberry Waffles topped with fresh blueberry sauce. Fluffy, crispy, phenomenal.

      Ingredients

    1. Greek Yogurt Blueberry Waffles:
    2. 2 cups all-purpose flour
    3. 2 and 1/2 teaspoons baking powder
    4. 1/2 teaspoon salt
    5. 3 tablespoons granulated sugar
    6. 1 and 1/4 cups whole milk
    7. 3/4 cup full-fat Greek yogurt
    8. 3 large eggs, at room temperature
    9. 1/4 cup unsalted butter, melted
    10. 1 cup fresh or frozen blueberries, if using frozen, do not thaw first
    11. Fresh Blueberry Sauce:
    12. 1 cup fresh or frozen blueberries, if using frozen, do not thaw first
    13. 1/3 cup orange juice, divided
    14. 2 tablespoons maple syrup
    15. 1/2 tablespoon cornstarch

    16.  
      Instructions
      1. Greek Yogurt Blueberry Waffles:
      2. In a large bowl, combine the flour, baking powder salt. and sugar; set aside. In a separate large bowl, whisk together the milk, yogurt, eggs, and butter; stir into dry ingredients just until moistened. Fold in blueberries.
      3. Using a 3/4 cup measuring cup, scoop batter, and pour onto a preheated waffle iron. Cook until waffle is browned and crispy on the outside, about 5 minutes. Repeat with remaining batter.
      4. Meanwhile, make your fresh blueberry sauce.
      5. Fresh Blueberry Sauce:
      6. In a small saucepan, placed over medium-heat, add the blueberries, 3 tablespoons of the orange juice and all of the maple syrup. Bring to a boil. In a small bowl combine cornstarch and remaining orange juice and whisk until smooth; gradually stir into berry mixture. Bring back to a boil and cook, stirring constantly, for about 2 minutes, or until thickened. Serve warm with waffles.